How to Keep Audio Clip Continuous From Premier to Audition
Adobe Audition
Adobe Premiere Pro CC is powerful in that it can mix, adjust, and even clean up your audio, but it can't replace a professional, audio, postproduction, digital audio workstation (DAW) like Adobe Audition (Figure 4.36). Sometimes you'll need to mix and fix your audio in a professional audio environment. I'll demonstrate two of my favorite solutions in Adobe Audition: removing noise and fixing clipped audio.
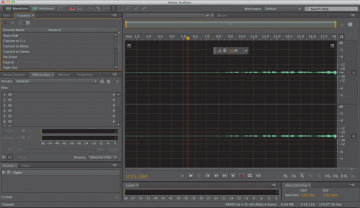
Figure 4.36 Adobe Audition CC will help you process audio clips that are beyond Adobe Premiere Pro's capabilities.
Removing Noise
Noise doesn't always fit in a tidy frequency range notch, and it can be quicker, more effective, and much easier to fix your audio noise problem in Adobe Audition by using its effective, two-step, noise removal tool.
The process is to send a clip to Adobe Audition, select an area of the noise alone (without foreground audio) for Adobe Audition to "memorize," and then select the entire clip to help it eliminate noise from the clip. What happens during this process is that Adobe Audition will generate the necessary signal to eliminate the noise and only the noise. To accomplish this task, follow these steps.
-
Right-click on the clip you want to send to Adobe Audition, and choose Edit Clip in Adobe Audition (Figure 4.37). This command renders your clip and replaces your audio with a dynamically linked audio clip, and launches Adobe Audition with this clip open. Adobe Premiere Pro will not send the original audio to Adobe Audition in order to preserve the original audio untouched, because any changes you make in Audition will permanently change this audio clip.
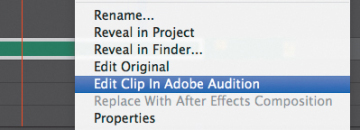
Figure 4.37 Choose Edit Clip in Adobe Audition to repair noise in your clip.
- Using the Audition Time Select tool (T), select a portion of the waveform that contains the noise but no dialogue.
-
Right-click on the selected area, and choose Capture Noise Print (Figure 4.38). Alternatively, you can press Shift+P. Then deselect your selection on the audio waveform so that the next step will apply to the entire waveform, not just the sample audio selection.
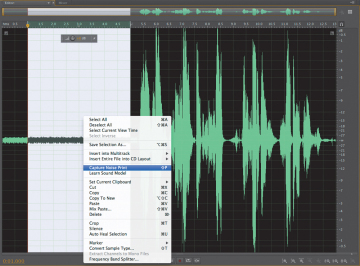
Figure 4.38 In Adobe Audition, select the noise, right-click, and then choose Capture Noise Print.
-
In the Effects menu, choose Noise Removal/Restoration, and then select Noise Reduction (process) (Figure 4.39) to launch the Noise Reduction Effect panel. You can also access this panel by pressing Command+Shift+P (Ctrl+Shift+P).
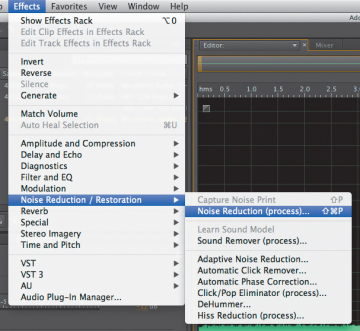
Figure 4.39 The Noise Reduction process in Adobe Audition is effective and easy to use. The best part is that you can send a copy of your audio clip directly to Adobe Audition from within Adobe Premiere Pro.
- Play your clip by clicking the play icon. Toggle the Effect Power State on and off as well as the Output Noise Only option while playing back the clip to further refine the noise reduction settings.
- Click the Apply button. Adobe Audition likely does a pretty good job of removing the unwanted noise floor automatically, but you can make further adjustments by using a noise gate or an EQ.
- Save your changes by pressing Command+S (Ctrl+S), and return to Adobe Premiere Pro. Your audio file will update with the fixed audio.
Using Adobe Audition to remove background noise
To get a better understanding of how the noise removal process in Adobe Audition works, follow these steps.
- Open the project Chapter04_Audio.prproj, and then open the sequence named Audition Noise.
- On the Timeline, right-click the clip and choose Edit Clip in Adobe Audition.
- Once in Audition, select a part of the clip that contains only the background noise and nothing else (click and drag to select). You can even zoom in if you desire (press +). This selects the background noise for that clip.
- Choose Effects > Noise Reduction / Restoration > Capture Noise Print (or press Shift+P).
- Click OK in the dialog that opens
- Click anywhere in the wave to deselect.
- Apply the effect by choosing Effects > Noise Reduction / Restoration > Noise Reduction (process).
- When the panel opens, play the clip and move the sliders until the room noise disappears. I used the values of 92% for Noise Reduction and Reduce by 46dB.
- While the clip plays, bypass the effect so you can get a good idea of the before and after (toggle the effect off and on again) sound.
- When you're happy with the settings, click Apply and save your clip.
- Go back to Adobe Premiere Pro; your clip is waiting for you there!
Fix Clipped Audio
As mentioned earlier, it's best to record your audio properly to begin with than have to fix it in postproduction. However, sometimes you have no choice but to work with what you have. If you do need to fix a clip that is clipped, you can fix it somewhat using Adobe Audition CC.
-
Right-click the clip you want to send to Adobe Audition, and choose Edit Clip in Adobe Audition. This command renders and replaces your audio with a dynamically linked audio clip, and launches Adobe Audition with this clip open.
-
In Audition, choose Window > Amplitude Statistics (Figure 4.40).
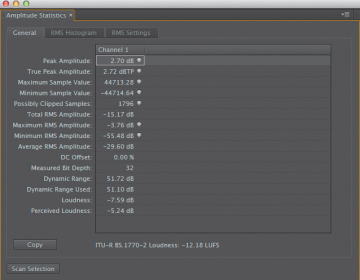
Figure 4.40 The Amplitude Statistics panel in Adobe Audition calculates statistics from an entire file or selection.
- Click the Scan button, and look at the Possibly Clipped Samples property to get a good idea of how much clipping is in your clip. Using this value will let you set the correct preset when using the effect. (You will be able to determine if the clip is heavily or lightly clipped.)
-
Choose Effects > Diagnostics > DeClipper (process) to open a new panel (Figure 4.41 on the next page).
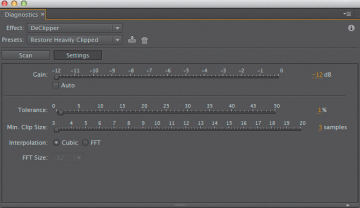
Figure 4.41 The DeClipper effect repairs clipped waveforms.
- Choose the preset that best represents the amount of clipping in the clip. Experiment with different presets if you're not sure.
- Click the Scan button.
- Click Repair All.
- Save your changes by pressing Command+S (Ctrl+S), and return to Adobe Premiere Pro. Your dynamically linked audio file will update with the fixed audio.
Using Adobe Audition to restore clipped audio
To get a better understanding of how to restore clipped audio, follow these steps.
- Open the project Chapter04_Audio.prproj, and then open the sequence named Audition DeClipper.
- On the Timeline, right-click the clip and choose Edit Clip in Adobe Audition.
- In Audition, choose Window > Amplitude Statistics to display the statistics and determine how much clipping is in the audio. This panel is for diagnostics only.
- Click the Scan button.
- Choose Effects > Diagnostics > DeClipper (process).
- When the panel opens, choose Restore Heavily Clipped and click the Scan button to identify which parts of the clips need to be fixed. A list of the problem areas appears at the bottom of the panel.
- Click Repair All and the effect will start working.
- Look at the waveforms when it is done. Much better, right?
- Experiment with the settings; repeat the process over and over to get a good idea of how the effect works and what the settings do (you can use undo to reverse your changes).
- When you're happy with the settings, save your clip and return to Adobe Premiere Pro.
petersentomentioun.blogspot.com
Source: https://www.adobepress.com/articles/article.asp?p=2171314&seqNum=7
0 Response to "How to Keep Audio Clip Continuous From Premier to Audition"
Post a Comment